
AWS Part 3 — Horizontal Scaling and Load Balancer
Perquisites:
What is Scaling and Why do we need it?
Types of Scaling
Load Balancer and Target Groups in AWS
Tutorial of configuring Load Balancer in AWS
Cleanup all resources
We will do everything with the hands-on tutorial on AWS Console.
What is Scaling and Why do we need it?
When a website experiences a sudden increase in traffic and crashes, scaling the system is necessary to prevent this issue.
Scaling involves either enhancing the specifications of our EC2 instance, such as increasing RAM, CPU, and storage, or adding more EC2 instances to manage the load.
Imagine buying a budget mobile phone with limited RAM and storage; it struggles with heavy games or multiple apps, similar to an EC2 instance that chokes under heavy traffic, necessitating system scaling.
Types of Scaling
Vertical Scaling
Horizontal Scaling
Vertical Scaling (Scaling Up/Down)
Increasing the specifications (RAM, storage, CPU) of the same machine to handle more load is known as vertical scaling.
For example, if our site has low traffic, we use a "t2.micro" instance type, and if the load increases, we switch to a "t2.medium" machine.
This type of scaling is primarily used in SQL databases and stateful applications due to the challenges of maintaining state consistency in a horizontal scaling setup.
Horizontal Scaling (Scale Out/In)
Adding more machines to distribute the incoming load is known as horizontal scaling.
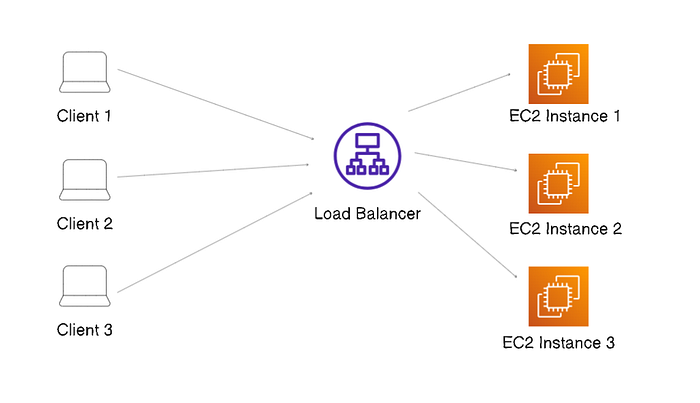
In this setup, clients send requests to a load balancer, which distributes the incoming traffic to the least busy machine, and horizontal scaling is commonly used in real-world scenarios.
The picture shows 3 clients making requests, with the load balancer distributing the load equally across 3 EC2 instances.
Load Balancer and Target Groups in AWS
Load balancers distribute incoming requests to the least busy server.
AWS provides 3 types of load balancers:
Application Load Balancer (ALB)
Network Load Balancer (NLB)
Classic Load Balancers (CLB)
Target Group
The ALB sends requests to a target group, which must be attached to an EC2 instance for the request to reach it.

Target Group TG1 is linked to the application load balancer, directing all incoming requests to the EC2 instances associated with it.
Features of ALB:
An ALB can attach multiple target groups and route requests based on criteria such as host headers, path, and source IP.
For example, you can set a rule such as: /api/ to forward requests to the Backend API target group, and /admin/ to forward to the Admin Panel target group. This approach is beneficial when microservices are deployed across different EC2 instances. You can attach various target groups and configure the ALB based on subdomains, parameters, and other URL criteria.When you configure an ALB, it provides a domain name instead of an IP address. Clients access your website by entering this ALB domain name in their browsers. As mentioned earlier, clients do not directly use "http://:8080". Instead, they connect to the ALB, which then routes their requests to the least busy EC2 instance.
🖥️ Step 1: Open EC2 Dashboard
Go to the AWS Management Console.
Navigate to EC2 → Load Balancers.
Click Create Load Balancer.
⚡ Step 2: Choose Load Balancer Type
Select Application Load Balancer (Layer 7, HTTP/HTTPS).
Alternatively, choose Network Load Balancer (Layer 4, TCP/UDP) if needed.
🔧 Step 3: Configure Load Balancer
Name: Give a unique name.
Scheme: Choose Internet-facing (public) or Internal (private).
IP Address Type: IPv4 or dual-stack.
VPC & Subnets: Select the VPC and at least two subnets in different Availability Zones.
🎯 Step 4: Create Target Group
Navigate to Target Groups → Create Target Group.
Target Type: Choose EC2 instances, IP addresses, or Lambda functions.
Name: Provide a descriptive name.
Protocol & Port: Example: HTTP, port 80.
Health Checks: Configure path (e.g.,
/health) and thresholds.
🔗 Step 5: Register Targets
Select EC2 instances to add to the target group.
Ensure they are in the same VPC as the load balancer.
Save and confirm.
🛠️ Step 6: Configure Listener
Back in Load Balancer setup, add a listener (e.g., HTTP on port 80).
Forward traffic to the target group you just created.
🚀 Step 7: Review and Create
Review all settings.
Click Create Load Balancer.
Once active, note the DNS name of the load balancer — this is what clients use to access your application.
🧹 Step 8: Cleanup Resources
Delete the Load Balancer when no longer needed.
Deregister and delete the Target Group.
Terminate EC2 instances if they were only for testing.
This setup ensures traffic is distributed across multiple EC2 instances, improving availability and scalability.